Install Huzzler App
Install our app for a better experience and quick access to Huzzler.
Trust is earned, not assumed.
When you’re feeding sensitive code, business ideas, or personal thoughts into an AI, you need to know: where does this data go?
I went down the rabbit hole of Anthropic’s Terms & Conditions. Here’s what I found.
The Core Question
Is my data being used to train Claude?
The answer isn’t a simple yes or no. It depends on your choices—and a few exceptions.
But it really mostly seems like a no.
When Your Data IS Used for Training
Anthropic will use your conversations if:
- You explicitly opt in — Model improvement is a toggle in your privacy settings. Off by default? No. You need to check.
- Safety flags trigger — If their classifiers flag your conversation, it may be used to improve safety models and enforce usage policies. This happens regardless of your settings.
- Special programs — Participation in things like the Trusted Tester Program grants training access.
What gets included? The entire conversation. Any content, custom styles, or preferences you’ve set. Claude for Chrome usage data too.
Worth noting: raw connector content from Google Drive or MCP servers is excluded—unless you directly paste it into the chat.
When Your Data Is not? used
Here’s the seemingly good news.
Incognito chats are protected. Even if you have Model Improvement enabled, incognito conversations won’t train future models.
Feedback via thumbs up/down buttons? Stored separately for up to 5 years, de-linked from your user ID.
But, if the safety classifiers flag your content, then your content will be kept.
How are the classifiers built though?
If you insist on using Anthropic, keep on reading.
How to Control Your Settings
On Desktop:
- Click your name in the settings menu
- Navigate to Settings → Privacy
- Toggle “Help Improve Claude” on or off
Direct link: claude.ai/settings/data-privacy-controls
On Mobile:
- Open settings
- Select Settings → Privacy
- Same toggle
This is simple. No dark patterns and no buried menus — just suspicion.
The Catch
When you disable training, it only affects new conversations.
Previously stored data and anything already used in training? That ship has sailed.
The Safety Exception
Even with training disabled, safety-flagged conversations may still be reviewed. Anthropic reserves the right to use this data for:
- Internal trust and safety models
- Harmful content detection
- Policy enforcement
- Safety research
This isn’t surprising. Every AI company does this. But transparency matters, and they’re upfront about it.
My Take
Can we trust Anthropic?
Here’s what I see:
The positive:
- Clear documentation of what’s used and what isn’t
- Accessible privacy controls
- Incognito mode actually means something
- They don’t hide behind legal jargon
The concerns:
- Safety exceptions create ambiguity around “disabled” training
- Past data can’t be retroactively excluded
- Default settings matter—and most users never change them
Trust isn’t binary. It’s a spectrum.
Anthropic sits on the more transparent end compared to competitors. They explain their policies in plain language. They give you real controls.
But “trust” and “verify” should always go together.
Practical Recommendations
If you’re using Claude for sensitive work:
- Check your settings — Visit claude.ai/settings/data-privacy-controls right now
- Use incognito for sensitive conversations — It’s the only guaranteed exclusion
- Assume safety reviews happen — Don’t rely on privacy settings for edge cases
- Read the actual policies — Don’t take my word for it
The Bottom Line
Anthropic isn’t perfect. No company is.
But they’ve built a system where informed users can make real choices about their data. That’s more than most can say.
The question isn’t whether Anthropic is trustworthy.
The question is: have you taken the time to configure your trust level?
Sources:
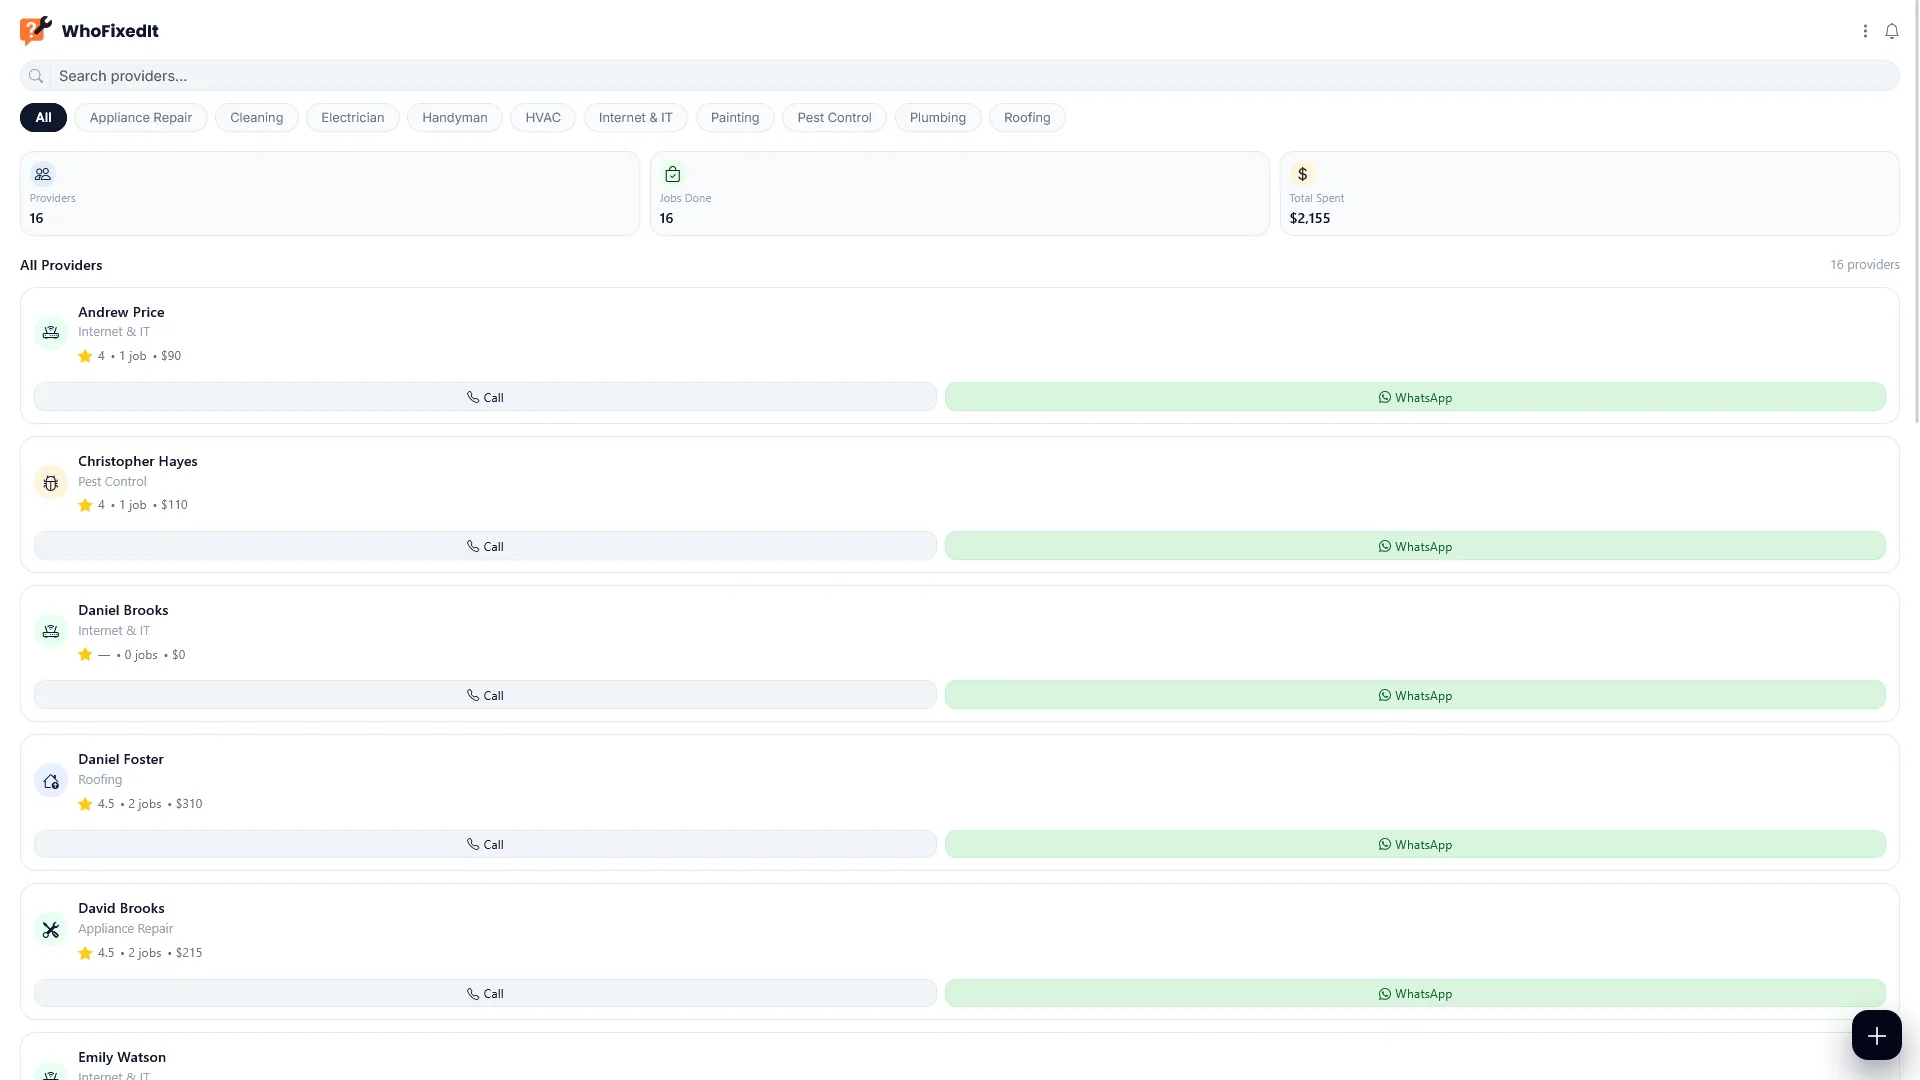
I kept losing track of which plumber, electrician, or technician worked on what at my home, so I built WhoFixedIt.
It’s a simple logbook where you can save service provider details, what they fixed, when the work was done, costs, photos, and notes. The next time something breaks, you instantly know who to call and what was done last time.
WhoFixedIt is available as an Android app on the Google Play Store and can also be used directly in a web browser.
I would love to hear your feedback or suggestions!
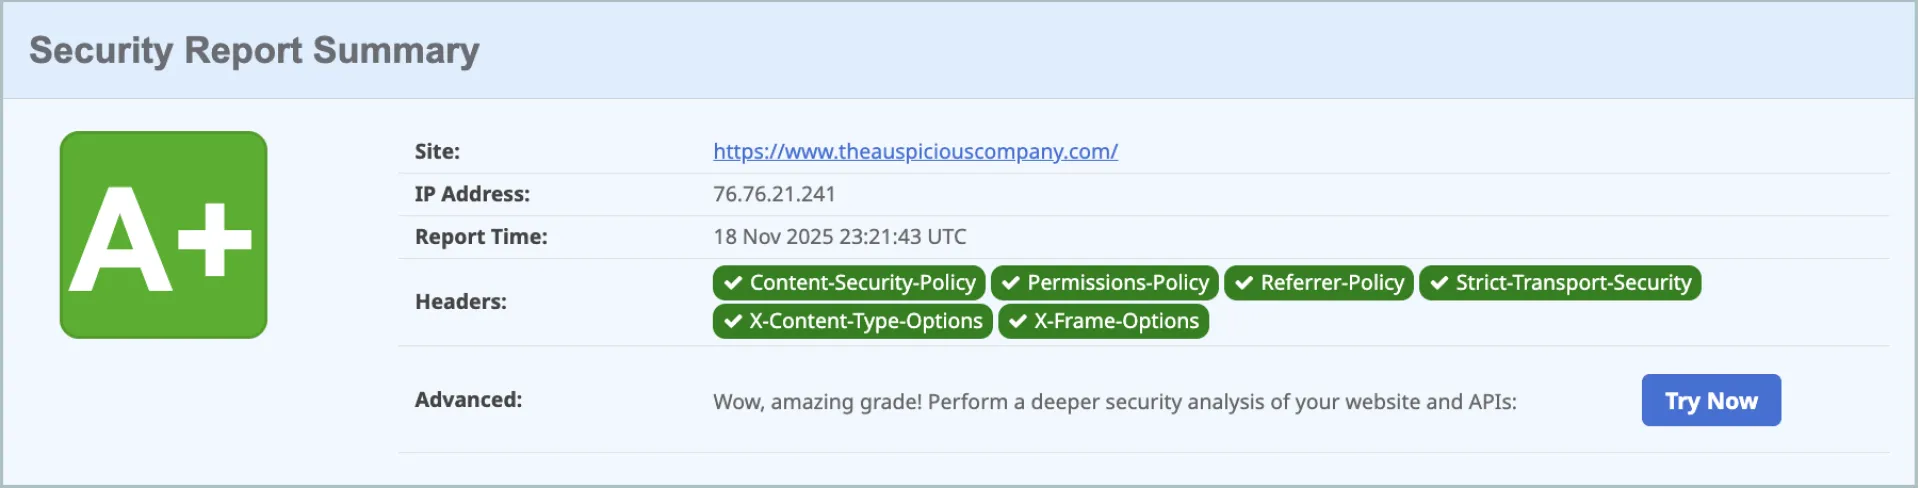
Every website is an HTML page, which comprises of 2 parts.
The Body, which is what we see on this webpage and Header, which is what makes the page secure, discoverable, and interactive.
When it comes to the security aspect of our webpage, there are a LOT of variables to take into consideration that extend beyond the Header section of an HTML, of course. However, that's out of scope for this post.
What prompted me to look into this was an article that showed how so many WordPress sites (which still dominate the web) are insecure.
Today, I want to focus on a few simple tools you could use to resolve this yourself whether or not you use WordPress.
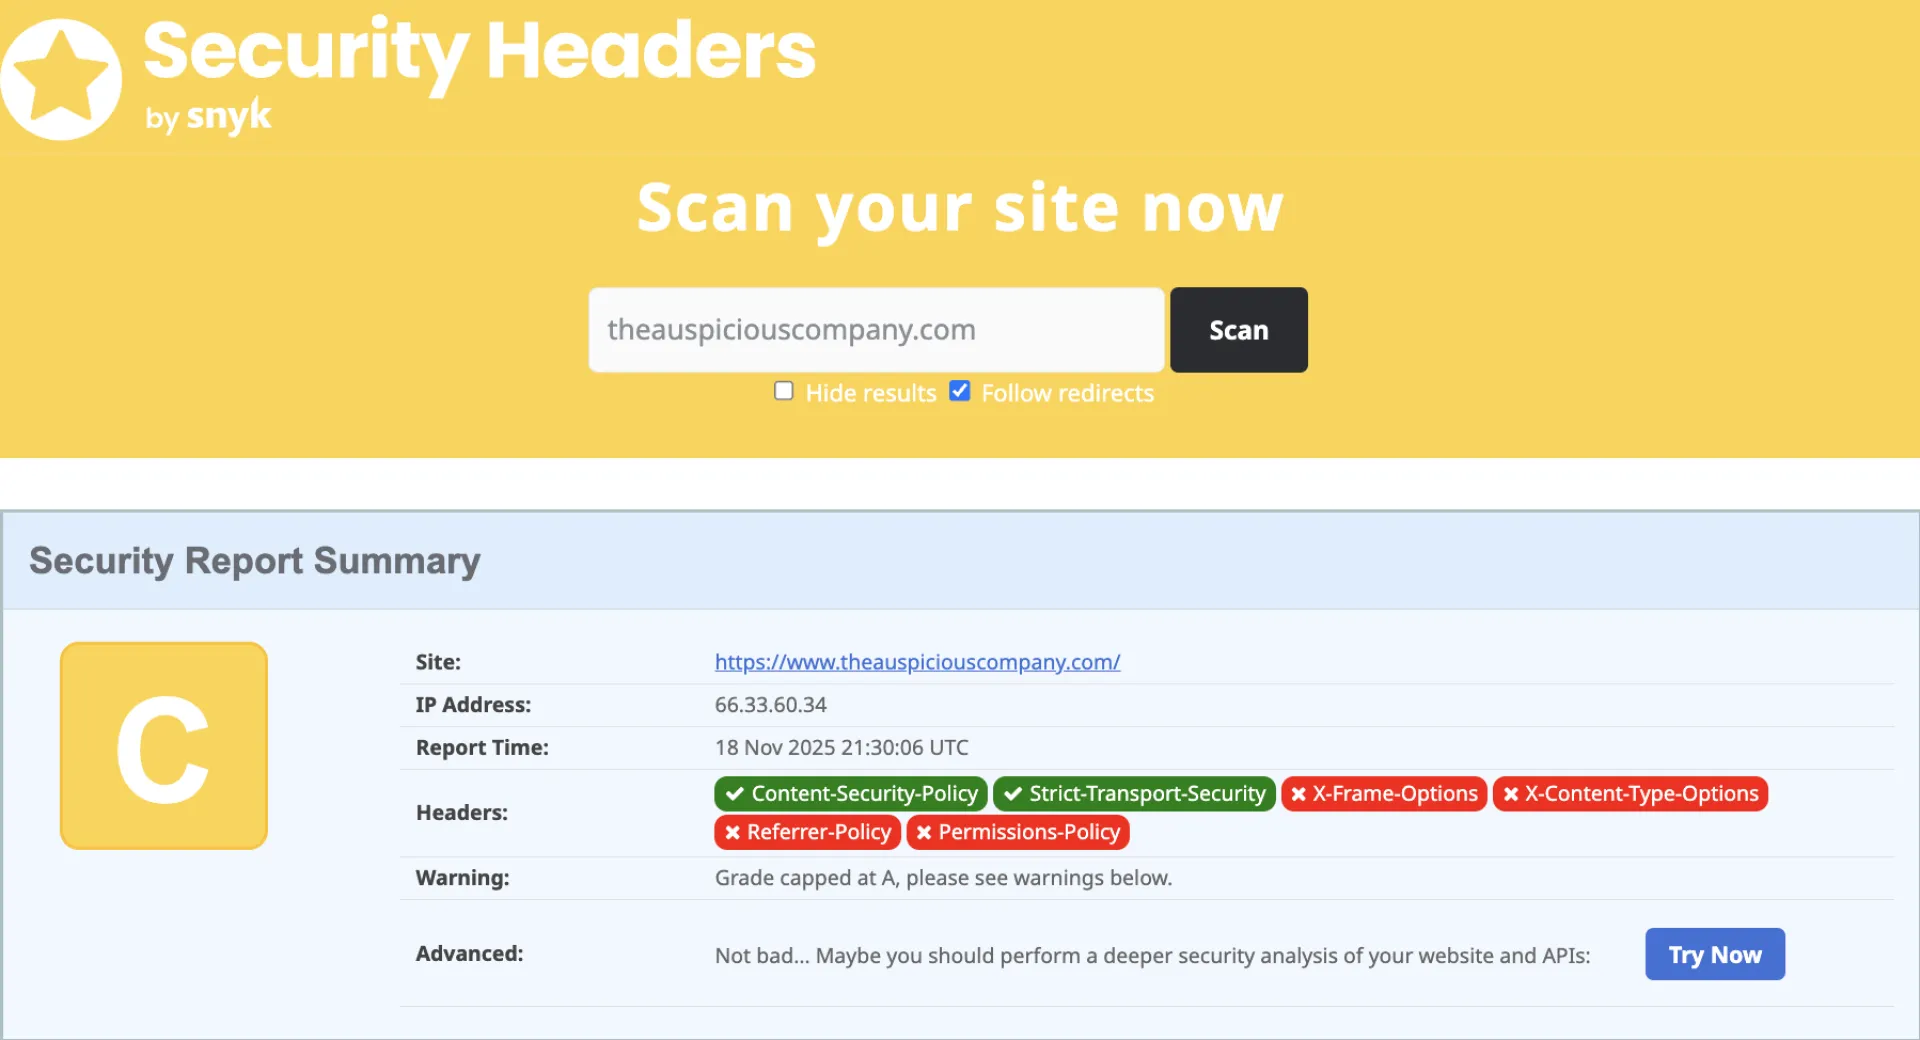
- SecurityHeaders.com - A free tool by Snyk, which you can use to scan sites for yourself or your clients
- A n8n automation to save the scan results on Gsheets and provide actionable recommendations and either handle them yourself, or use a code editor such as Claude Code, Cursor, etc to handle them
If WHY is not clear, just consider these 2 edge cases.
- A failed Content Security Policy, can result into someone stealing your cookies or even injecting an unsafe form that could result into your PII and credit card info being leaked.
- A failed Permissions Policy, could result into your Mic/Camera being accessible by malicious actors.
Long story short, take Security seriously.
The Rice Purity Test remains a quirky yet fascinating cultural mirror. Your score doesn’t define who you are it just highlights your unique experiences and choices along the way. Whether you’re scoring a pristine 98 or a battle-worn 12, what really matters is understanding yourself, not the number at the end.
So go ahead, take the test, laugh a little, and maybe learn something about who you’ve become.
I initially created fullcountdown.com for myself (The first version was a simple big timer with play and pause, without any other options), to put it on a mini-screen I have next to my desk connected to my computer, where I usually put secondary things, such as YouTube videos, notes, and timers.
Before having it, I used some online timers, but none of them take advantage of the full screen size, they all adjust the numbers proportionally, which makes sense, nobody wants to distort text or numbers, I understand that perfectly, I'm a designer and nobody ever asks me to design something with distorted text...
But sometimes I prefer functionality over beauty, and in this case, I don't care if the numbers are distorted. I want the largest timer possible for my screen, and that's the concept I've been working on.
Right now, it's a functional concept, and I'll gradually improve the interface and design.
And all feedback are welcome! 🙂

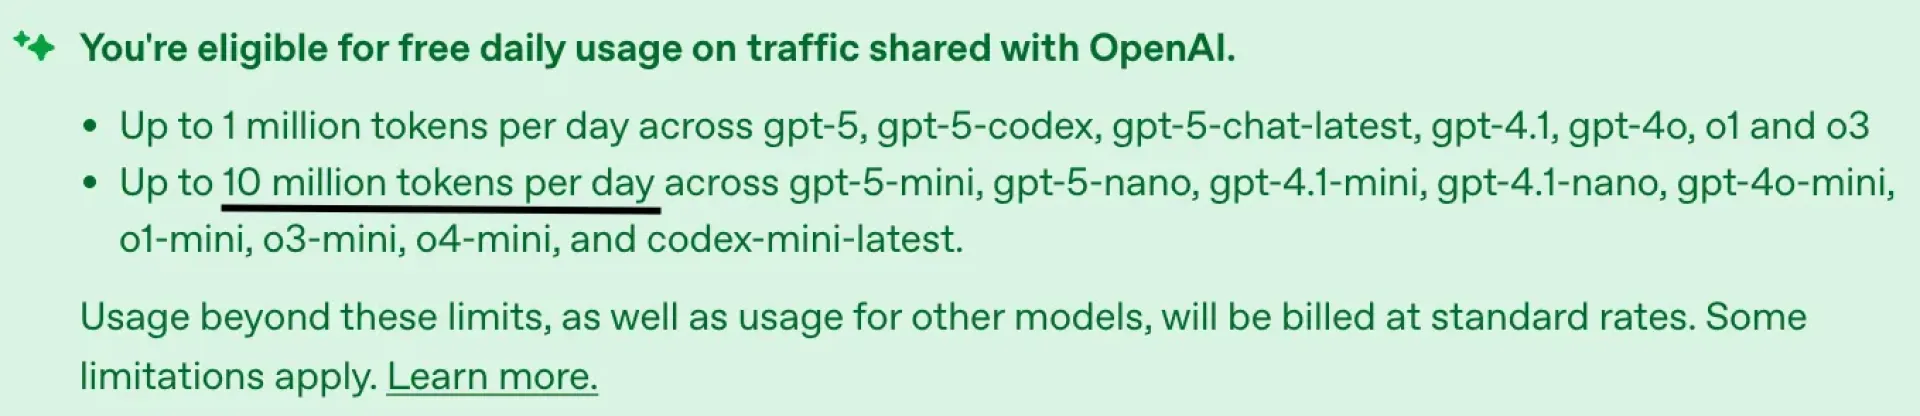
Most developers may not know this.
OpenAI quietly sponsors up to 10 million free tokens every day if you enable data sharing in your API settings.
That’s roughly 5,000 pages of text daily, enough to power an entire product prototype or content engine — for free.
If your prompts don’t include sensitive data, this is the easiest way to run the GPT-5 API nearly cost-free.
How it works
Model TypeFree Tokens/Day (Tier 3–5 users)
Equivalent TextMini models (gpt-5-mini, 4.1-mini) -> 10M~5,000 pages
Main models (gpt-5, 4.1, o3) -> 1M~500 pages
For Tier 1–2 users, the limits are about 25% of that.
Activate in 3 Steps
1️⃣ Visit platform.openai.com → Settings → Organization → Data Controls
2️⃣ Under “Share inputs and outputs with OpenAI”, select Enabled for all projects
3️⃣ Click Save — your account is now enrolled
Your daily allowance refreshes automatically.
Why It Matters
For builders, that’s effectively free compute for:
- Rapid-fire idea testing
- Text generation pipelines
- Automated research or content workflows
Just remember: disable sharing for any project involving private or client data.
This video tutorial shows how to build a complete web scraping workflow by combining Crawl4AI, n8n, DigitalOcean, and Supabase. It walks through checking site permissions (robots.txt, sitemap.xml), setting up a Docker-hosted Crawl4AI endpoint on DigitalOcean (with memory sizing, port configuration, and securing via API token), and then building an n8n flow to fetch URLs from a sitemap, loop through them, scrape each listing, and finally push structured data into Supabase for retrieval and use in a RAG (retrieval-augmented generation) system. The result: you can ask natural-language questions (e.g. “any four bedroom listings?”) and have your AI agent answer based on fresh scraped data.
The Self-Hosted Software List provides a broad selection of software that you can host yourself. It emphasizes customization, privacy, and minimizing reliance on third-party services.
This is a comprehensive video that covers 5 ways (local and cloud based) to host n8n.
- npm
- docker
- render
- railway
- digital ocean
I learned a lot making this video. Now I can save my clients' money. I am sure they will appreciate it !

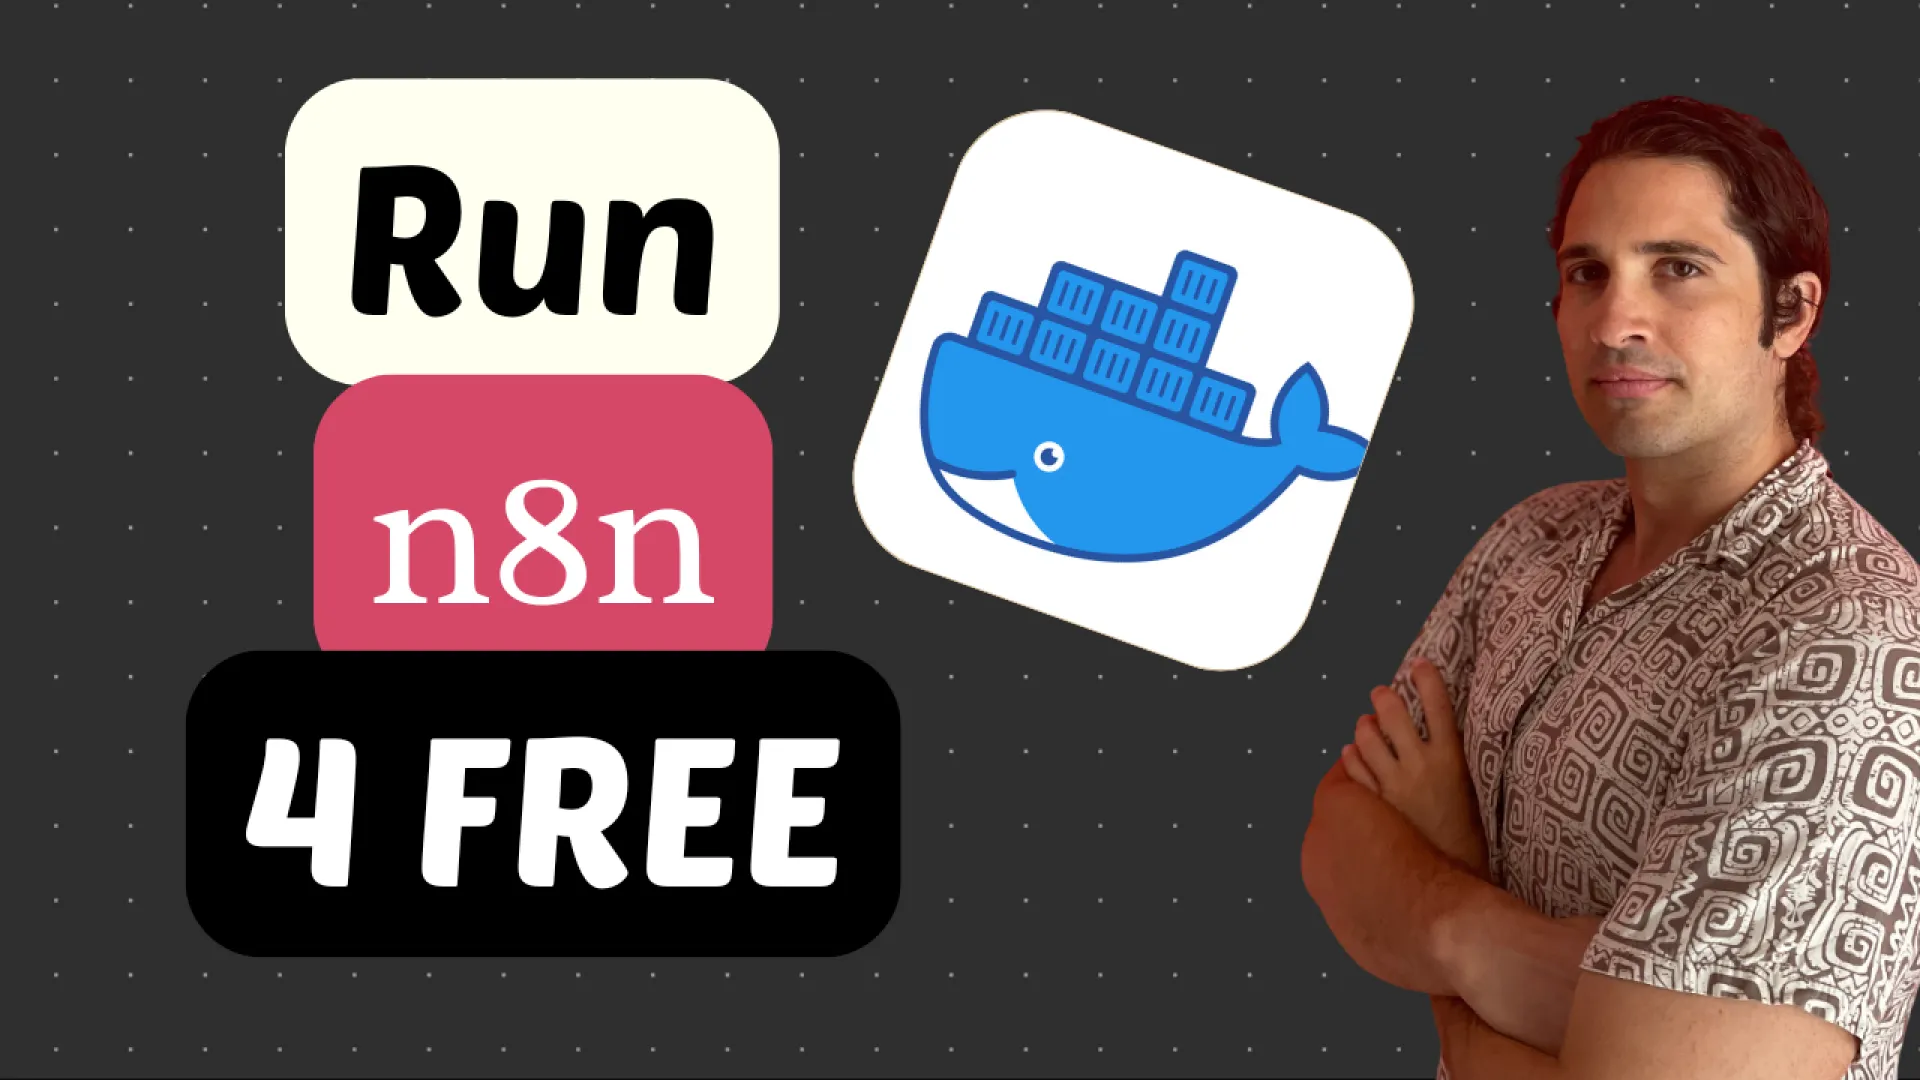
In the last post, I shared how you can self-host via npm. If you are looking to run n8n locally for yourself without overhead -- that's the best way!
However, if you are considering of having cron triggers or using n8n as your backend 24/7, then this is a great tutorial for you.
All in all, it's quite simple.
Steps
If you have downloaded Docker, go to Step 3
- Download Docker from Docker dot com — pick the version that matches your computer
- Install it > Open the Docker App on Desktop
- Docker Hub > Search for n8n
- Choose n8nio/n8n > Click “Pull”
- Images > Click the “Run” button to start > Expand the dropdown menu of the Optional Setting
- Ports: you can input whatever port you like, e.g. 5678, under the host port field > Run
A client of mine needs to cut down on costs. (So do I!)
Turns out, you can n8n locally for FREE.
It's as simple as:
- npx n8n
- n8n
Then you get : http://localhost:5678

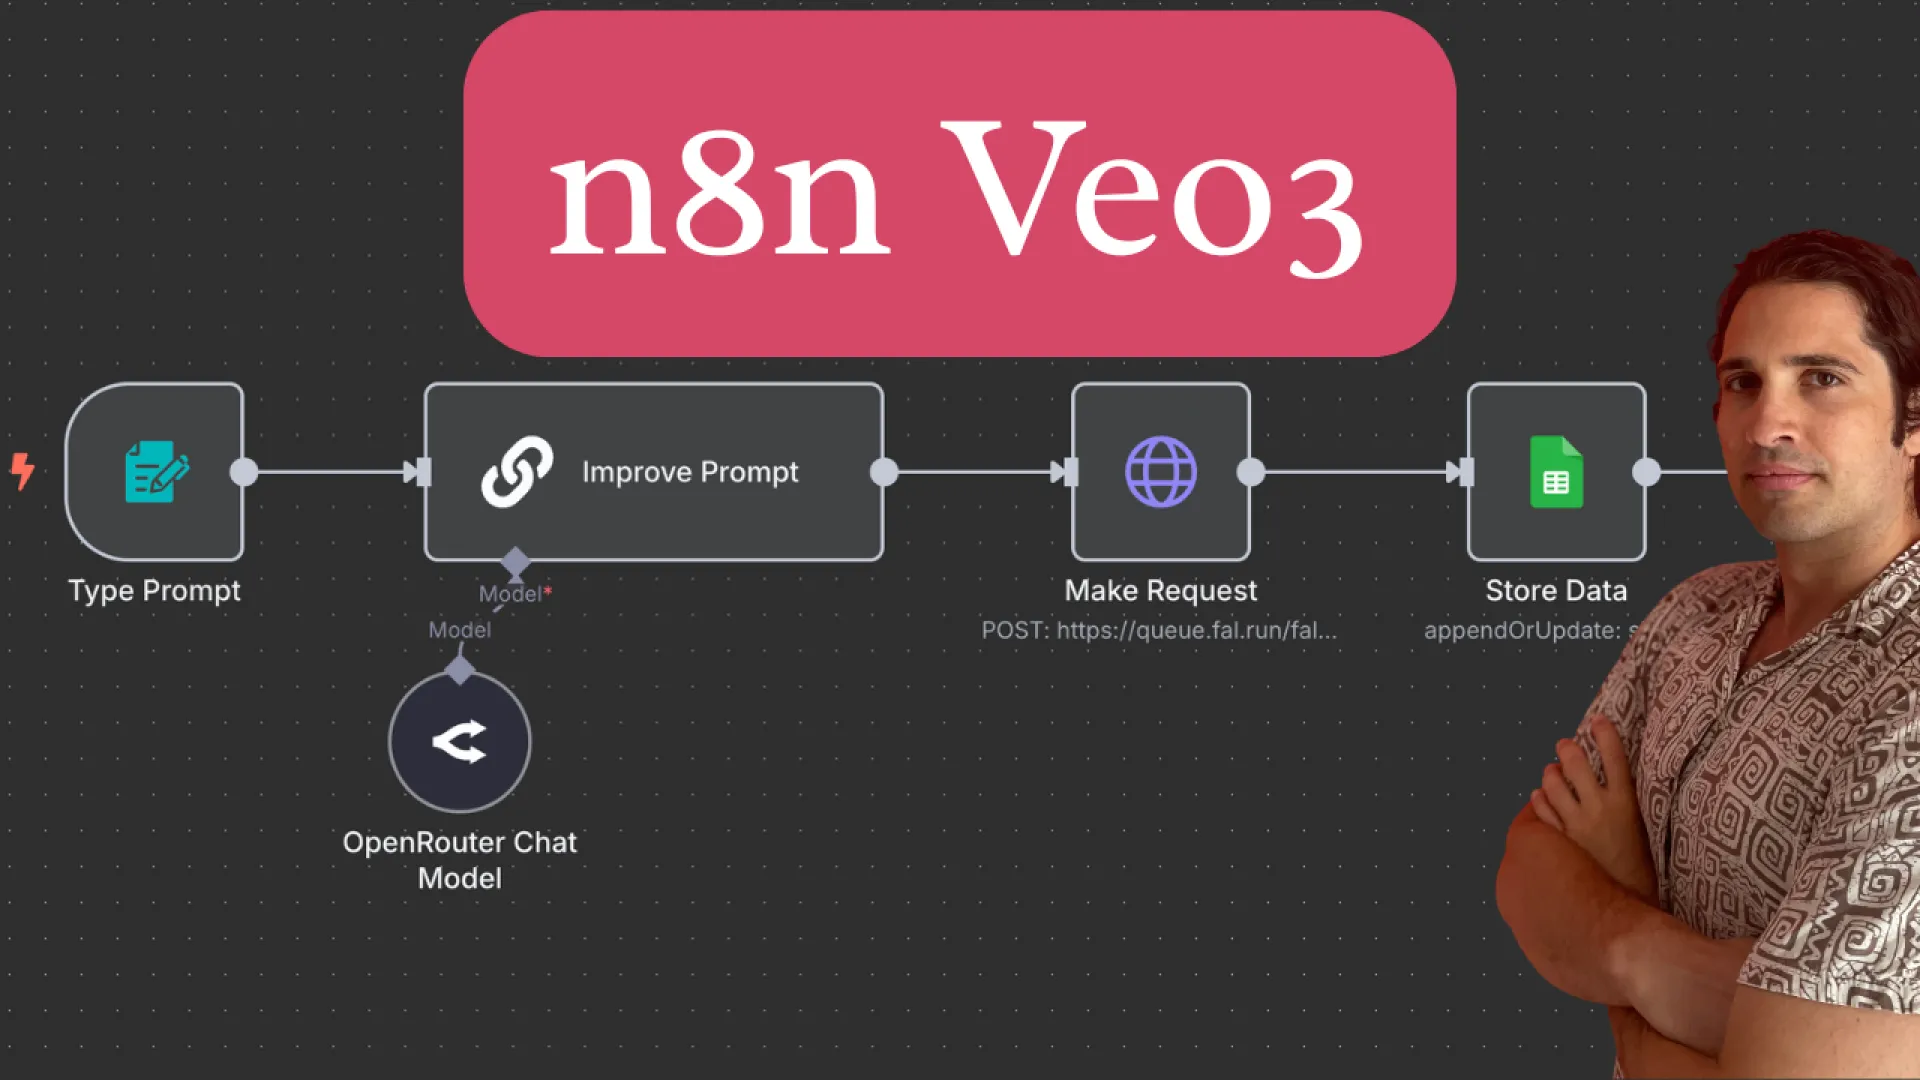
Today I got notice that the Veo3 API is publicly available through fal ai.
So I made a video that walks you through.
It's an impressive model BUT quite expensive. It's ~1$ per video second.
Here's the demo!
A bit about the flow.
How It Works
1. A user submits a video prompt through a form.
2. An AI agent (using OpenRouter's Google Gemini 2.5 Flash model) refines the user's prompt into a detailed "script-to-screen" format suitable for video generation.
3. The refined prompt is sent to the FalAI Veo 3 model via an HTTP request to generate the video.
4. Details of the video request, including the date, the refined prompt, and the request URL, are stored in a Google Sheet.
Setup
To run this workflow, you need to set up credentials in n8n for:
* OpenRouter: Generate API key from your OpenRouter account.
* Fal AI: Generate API key from your FalAI account
* Google Sheets: Uses OAuth 2.0. Connect by authenticating your Google account.
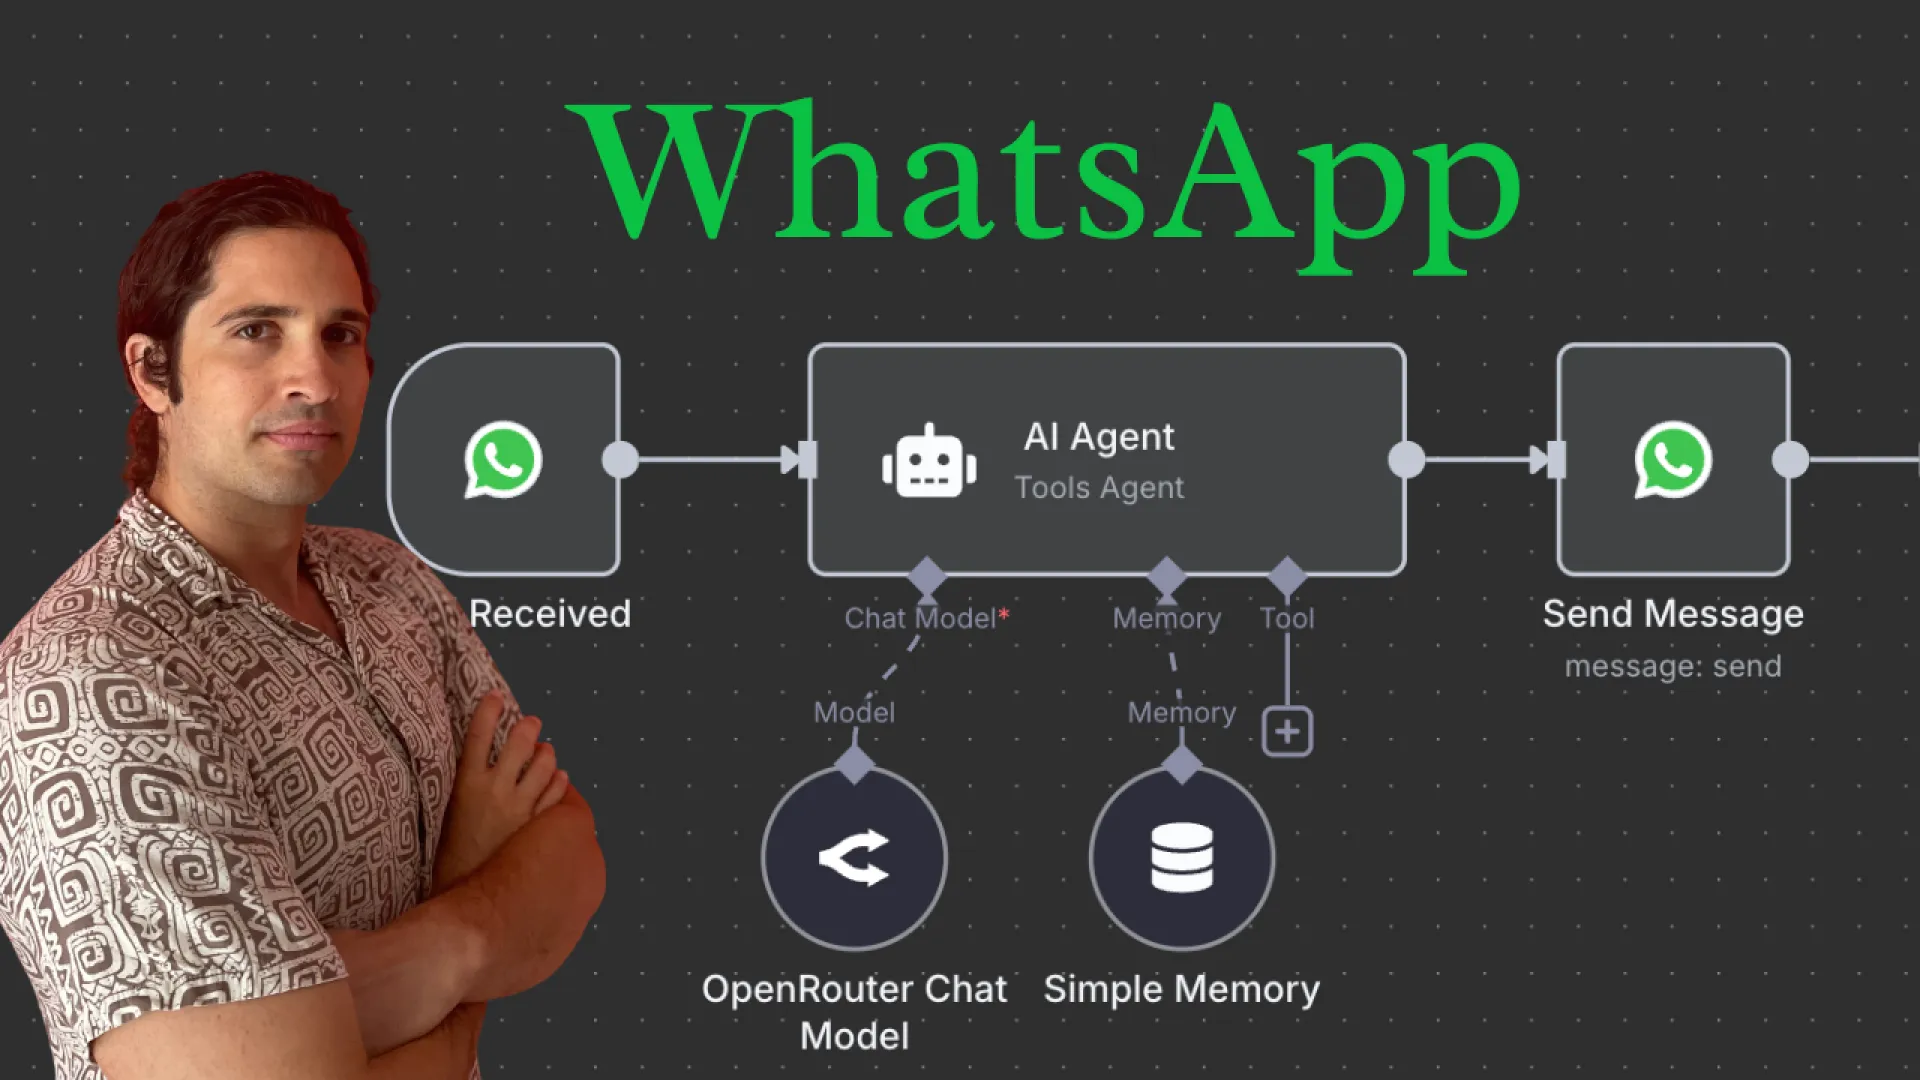
Hey guys,
This tutorial walks you through along every step of the way. It's a tedious process, but you can do it.
Reason I made this is because WhatsApp has 1+ Billion users. Lots of clients have asked me to help them with a WhatsApp chatbot.
In summary what I did was:
Sett up the WhatsApp Trigger in n8n
Configure the Facebook/Meta Side
Connect n8n and Setting up the AI
Configure the WhatsApp Send Message Node
Finalize and Test the n8n Workflow
Activate and Live Test the Full System
Here's a full length write up on Medium.
Here's the YT Tutorial.
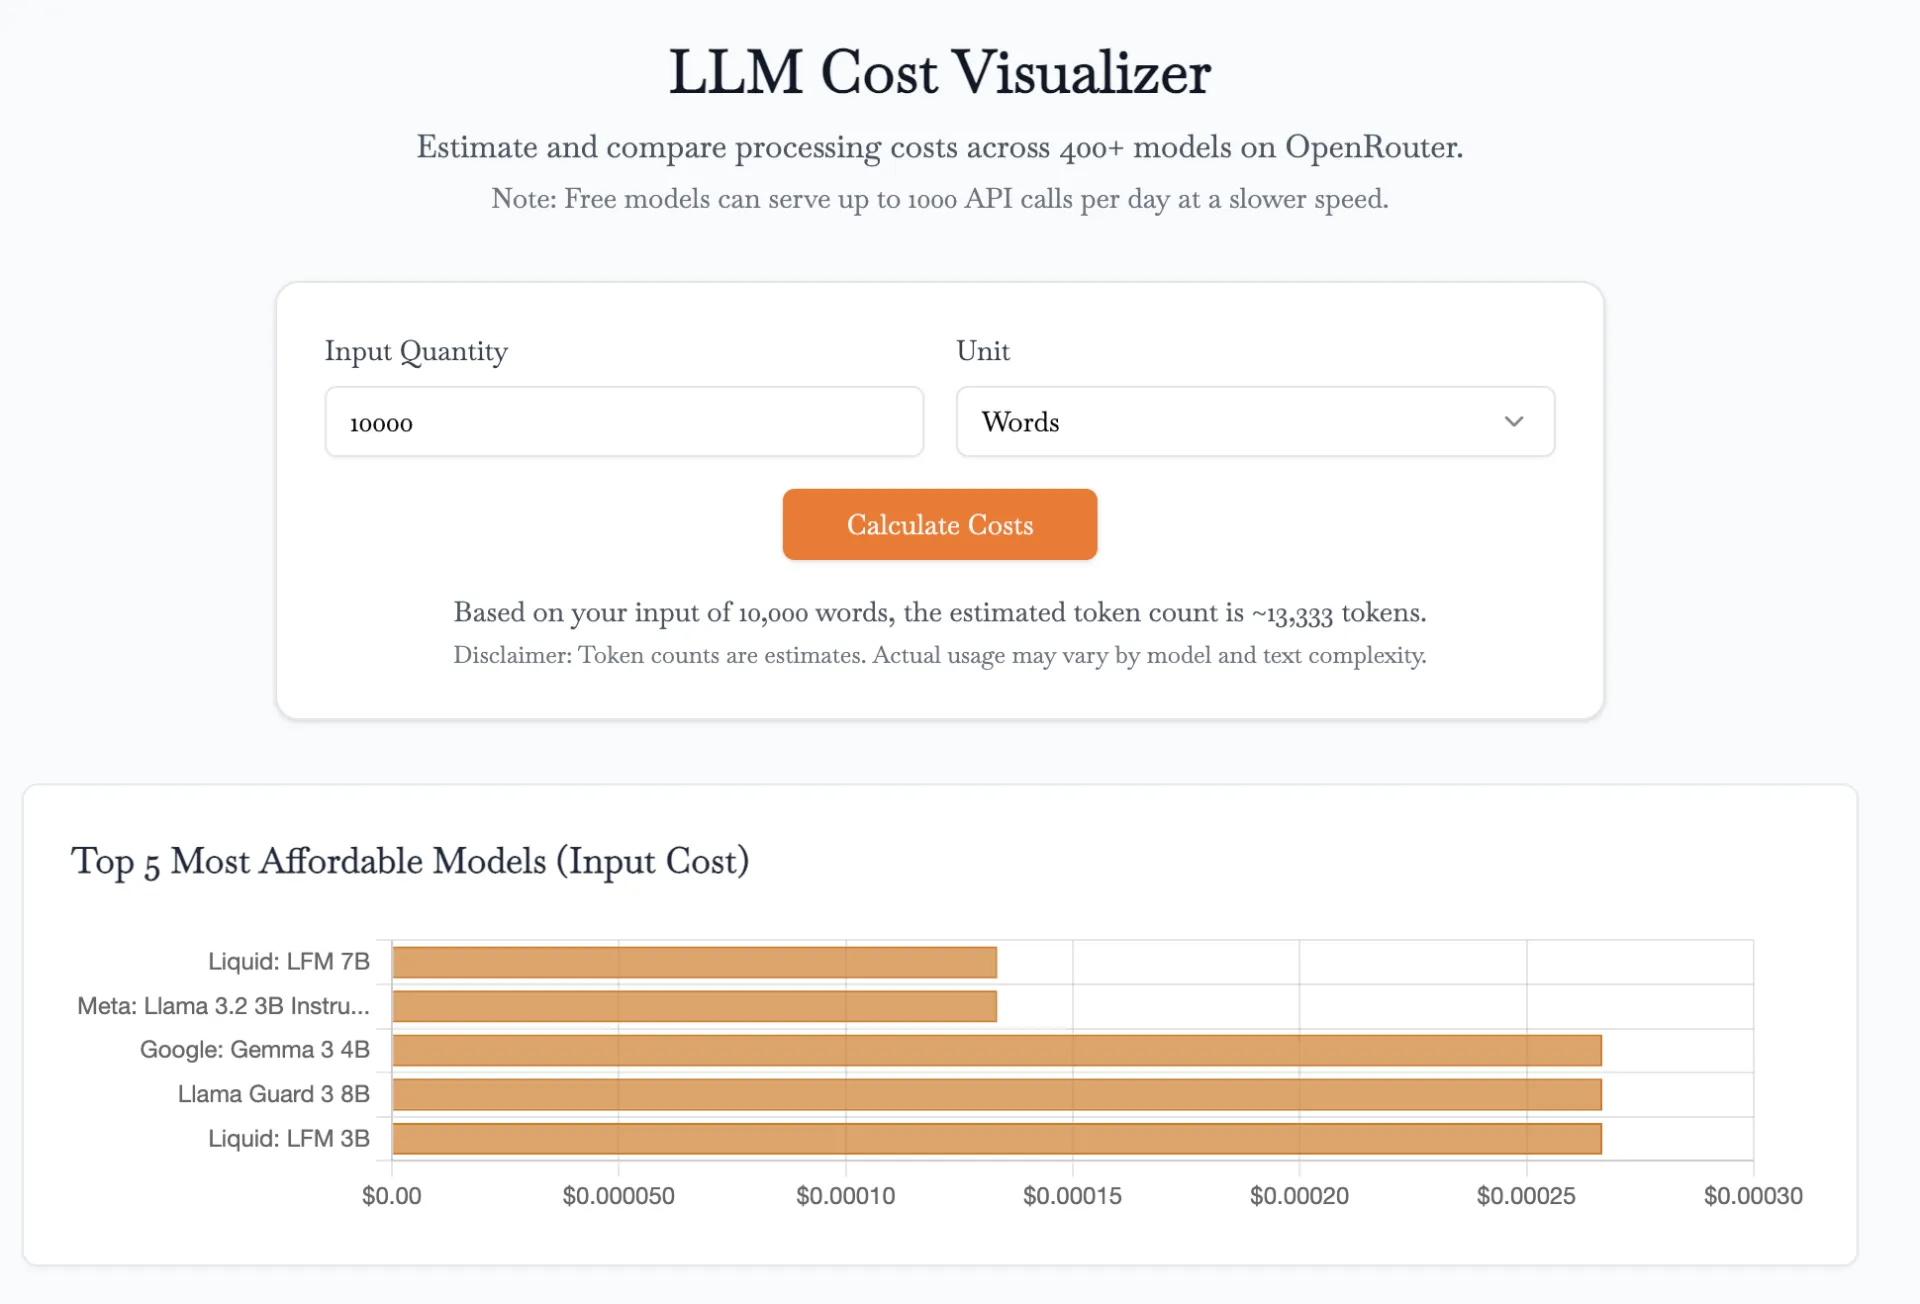
Given that we use LLM virtually daily, and some of us, have to relay those costs to clients/colleagues, I figured I create a tool for the purpose.
How I made it
- Crafted a prompt and fed it into Google Gemini 2.5 Pro Research.
- Created a mockup on Gemini.
- Revised it using Lovable.
- Ported the code into VS Code and integrated it into my project.
- Deploy!
Check it out here.
Also, a small YT demo.
(Part 3) : Upgrading, testing and expanding your game
(This is the part 3 of this post if u haven't read the part 1 and part 2 you can have a look on it before u go through this post.)
Now that your game is functional, it's time to upgrade it slightly and test it whether its working properly and then level it up with new features. This final phase turns your game into something smooth, fun and shareable.
STEP 1 : UPGRADE THE EXPERIENCE
Ask Chatgpt to help with cool additions like:
- Colorful terminal output. (for console based games)
- Better UI flow or sound effects. (UI means user interface)
- Animations or scoreboards. (for browser games)
STEP 2: TEST EVERYTHING
Run your game in Replit and play it like a real user or play it as a trial to see how your game is and how it runs. Watch for:
- Bugs (like skipped questions or logic errors)
- Missing feedback (does it show correct/wrong responses?)
- Flow issues (does the game feel smooth and complete?)
Then check whether your game is built as per u want, if not then remodify your game by interacting with the Replit's AI and explain it how you want it.
STEP 3: EXPAND THE GAME WITH NEW COOL FEATURES
Once your game is stable, make your game more better and complex:
- Add levels or stages.
- Create a timer for gameplay. (if necessary)
- Track high scores.
FINAL STEP: PUBLISH IT
Once your done with your game , Replit allows you to publish and share your game via a link. Perfect for feedback, Personal portfolios or Impressing friends.
This is the way you can build your first game using AI without any coding skills and you can also personally check Alex Finn a youtuber who has explained about game development in Replit. (https://youtu.be/HlQnuhMDG14?si=rej8BrzKQX2wjO74)
SOME CHATGPT PROMPTS THAT CAN BE USEFUL IN THIS PROCESS:
(Don't use simple prompts instead use this when required):
- "My Python game crashes when no input is given. How do i fix it?"
- "How to add a game-over screen with play-again option."
- "How to improve the user input handling for smoother flow."
- "How do i add a level-up system for my game in python language."
- "Help me to add a save and load player progress option in my game."
SOME TIPS BASED ON WHAT I EXPERIENCED:
- Start with a basic version of your game and then upgrade more stuffs in it.
- Talk with the Replit AI as your friend and prescribe your way that you want to build the game.
- Don't write a whole big paragraph on what you want to build instead break it into smaller components and then explain it. (the results would be more accurate)
- If you just can't understand what's the bug or error in it take a screenshot and upload it to Chatgpt it would try to help you.
- After every small change you make in the code, run the game in Replit's console. This catches bugs early and saves time. Don't wait to test everything at the end.
THANK YOU, HOPE THIS WAS HELPFUL

(PART 2) : Writing game logic with ChatGPT prompts
Now that your REPLIT PROJECT is set up , it's time to build the code of your game- THE LOGIC. This is where CHATGPT becomes your most powerful coding companion.
STEP 1 : BREAK YOUR GAME INTO COMPONENTS
Start by identifying the basic elements of your game. For example, in a quiz game, you might need:
- A list of questions and answers.
- A way to get user input.
- A scoring system.
- A game loop to go through all questions.
Break these into tasks and ask CHATGPT for help one by one.
STEP 2 : USE SPECIFIC PROMPTS
Instead of saying "make a quiz game", use clear , focused prompts like:
- "Write a python function that shows a question and checks if the answer is correct."
- "Generate JavaScript code to keep score in a game."
- "Explain this loop and how it tracks user input."
CHATGPT responds with code , often with comments. YOU CAN COPY-PASTE DIRECTLY INTO REPLIT, test it , and ask CHATGPT to refine or fix errors.
STEP 3 : COMBINE AND TWEAK
After gathering the parts-questions, logic, scoring-combine them. You can ask CHATGPT to help merge them into one program or help organize the code into functions.
(PART-1):Imagine having a powerful coding partner that helps you write ,debug, and improve your game code instantly. That's exactly what happens when you combine REPLIT's easy-to-use online coding platform with the intelligence of CHATGPT. Together, they make game development faster, smarter, and more accessible-even if you're new to programming.
FIRST PART: SETTING UP YOUR GAME DEV ENVIRONMENT WITH REPLIT AND CHATGPT
Building a game doesn't have to start with a heavy setup or complicated software. REPLIT, a browser-based coding environment, makes it incredibly easy to begin. All you need is an account and a browser-no downloads , no installations.
STEP 1 : CREATE A REPLIT ACCOUNT
Visit replit.com , sign up, and click" +Create REPL". Choose your language(Python is a great for beginners; JavaScript if you're aiming for browser games).
STEP 2 : DEFINE YOUR GAME IDEA
Before writing any code, think of what you want to build . A side scroller? A simple tic-tac-toe? This helps you focus and ask CHATGPT more precise questions.
STEP 3: OPEN CHATGPT FOR SUPPORT
Now, open CHATGPT in another tab. You'll use it as your coding assistant that will generate the required game logic, create levels, fix bugs, or explain the code and design the background for the game and will do the rest of the job to explain the game to be developed by REPLIT .

Alright, in this YT tutorial, I show you how to extract emails using MindStudio.AI.
- It's a browser extension and meant for low-tech professionals.
- They allow for up to 1000 free executions / month

Actively marketing our products is necessary, but it should be quick.
That's why I made a free tool on n8n that anyone can use (template pending approval by n8n)
The workflow is simple.
- Assign keywords and subreddit channel
- Assign model and prompt
- Assign Gsheet ID and pick tab to append rows in
To run completely for free, make sure to limit your search results, by setting the upvotes filter to a higher number -- OpenRouter doesn't allow more than 5 requests / min with their free tier.
Here's the tutorial

Yesterday I made a post on how to use Gemini + Gamma to make a website in minutes.
Honestly, it's an amazing combination.
But, did you know that GenSpark, can do a similar job for you without using any other tools ?
This was my prompt
I am creating a video on the meaning of colors across cultures.
return a well formatted report with a table on the meaning of colors across all the major cultures, such as Western, Chinese, Indian, West African, Native American, etc
make it into a presentation.
This is what it returned.
Now I can design my course on color design much faster.
Here's the YT Tutorial.

This is the 3rd part of the Vibe Coding tutorial series. If you missed the first two, you can check them out here:
- First Post - Vibe Coding: How to Build Anything Using Simple English Prompts
- Second Post - Cursor Rules Guide
This is a guide to connect GitHub with Cursor using MCP (Minimal Command Protocol). MCP allows you to interact with GitHub directly from Cursor. Once connected, you can use prompts like:
- Create a new repo with the current app you’re building
- Push your code to GitHub with a single command
- Search for repositories, pull requests, or issues
- Edit files or manage issues without needing to type Git commands
Just give Cursor a prompt, and MCP handles the rest, making your GitHub workflow effortless!
Step 1: Generate a GitHub Token
Visit this link: Generate Token
- Name your token
- Set the expiration date (I usually set it to "30 Days")
- Under Repository Access, choose “All repositories” or select specific ones as needed
Step 2: Set Basic Repository Permissions
Give read and write access to the following scopes:
- Actions
- Administration
- Commit statuses
- Contents
- Issues
Scroll down and click Generate token, then copy the token.
Step 3: Connect via Smithery
Go to: Smithery GitHub Server Setup
- Log in with GitHub
- Select the IDE you're using (Cursor, Windsurf, etc.)
- Paste your GitHub token under
githubPersonalAccessToken - Click Save and Connect
Note: Smithery is open-source, but be cautious when giving access to your personal account.
Step 4: Add GitHub MCP to Cursor
Once you've clicked Save and Connect on Smithery, you'll get two options: npm or JSON. I recommend choosing JSON.
- Click on JSON, then copy the full configuration.
- Open Cursor
- Go to Settings → MCP Servers → Add New Global MCP Server
- Paste the JSON you copied
- Hit Save
Step 5: (Optional) Enable YOLO Mode
Cursor → Settings → Features:
- Enable YOLO Mode to let the agent run tools without asking for confirmation each time
- Enable Delete File Protection so files aren’t deleted without warning
With this setup, Cursor can:
- Create/Edit and upload repositories
- Search repositories, issues, and users
- Push code directly to GitHub
- Automate workflows
Coming up next:
A full guide on installing browser-tools, no more screenshots or back-and-forth debugging. With this, Cursor can directly interact with your browser.
You’ll be able to open Inspect Element (F12), click on any section of your site, and then just go to Cursor and ask: "How can I improve this?" or "What’s wrong here?"
It can read the DOM, check console errors, network logs, and even take screenshots.
This is the second part of the original post: "Vibe Coding: How to Build Anything Using Simple English Prompts."
In this post, you’ll find the Cursor Rules Guide, which outlines essential principles for clean, simple, and effective coding in the Cursor IDE.
1. Initial Setup (Cursor Settings)
In the Cursor IDE (or the tool you are using):
- Open Cursor.
- Navigate to Settings.
- Under Rules, paste the default rules listed below or in Cursor-Rules (Google Doc) . This will provide a baseline for users.
- Tick the option Include .cursorrules file.
This will allow you to load a separate .cursorrules file from your project directory for extra flexibility.
2. Directory Setup
In the directory where Cursor is opened:
- Create a file called
.cursorrules. - Add any additional or modified rules there.
This keeps default rules safe and clean, while still letting you customize project-specific rules.
3. Community Contributions : Suggest Your Own Rules (Google Doc)
- You can comment to suggest new rules or improvements.
- I will manually review and update them.
- Even if not updated immediately, everyone can view all comments.
- Important: Please do not delete or strike out others' comments. Let’s keep it transparent and collaborative!
Note: These are all my personal rules and are mostly inspired by David Ondrej. Feel free to remove, add, or modify them based on your needs!
Cursor Rules : Cursor-Rules (Google Doc)
# Fundamental Principles
- Write clean, simple, readable code.
- Implement features in the simplest possible way.
- Keep files small and focused.
- Test after every meaningful change.
- Focus on core functionality before optimization.
- Use clear, consistent naming.
- Think thoroughly before coding. Write 2–3 reasoning paragraphs.
- Always write simple, clean, and modular code.
- Use clear and easy-to-understand language. Write in short sentences.
# Error Fixing
- DO NOT JUMP TO CONCLUSIONS! Always consider multiple possible causes.
- Explain problems in plain English.
- Make minimal necessary changes.
- For strange errors, ask the user to perform a Perplexity web search.
# Building Process
- Verify each new feature works by telling the user how to test it.
- DO NOT write complicated and confusing code.
- Opt for simple and modular approaches.
- When unsure, tell the user to perform a web search.
# Comments
- ALWAYS add helpful and explanatory comments into the code.
- NEVER delete old comments unless obviously wrong or obsolete.
- Include LOTS of explanatory comments.
- Document all changes and their reasoning inside comments.
- When writing comments, use clear and easy-to-understand language. Write in short sentences.
If you're looking to build a SaaS, web app, or even a website without coding knowledge, Cursor is the tool you need. This guide will walk you through the process of Vibe Coding, which means building apps and websites using simple English prompts and Cursor. You don’t need to write complex code, just interact with ChatGPT and Cursor, and you're good to go.
Step 1: Watch the Setup Guide
Before you dive in, make sure you set up Cursor properly to unlock its full potential. Here's a guide by DavidOndrej that explains the best settings for Cursor: Watch the setup guide here.
Step 2: Brainstorm Your Idea with ChatGPT
Once Cursor is set up, the next step is to brainstorm your app idea with ChatGPT. Use ChatGPT to clarify your app's functionality and structure. Here's how:
- Think about the app you want to build – What will it do?
- Ask ChatGPT for help with your tech stack and features.
For example, you might ask:
"I want to build a SaaS for goal tracking with user login, a dashboard showing charts, and a settings page. What tech stack should I use?"
Once you get a solid idea, ask ChatGPT to generate a prompt for Cursor that will help you build the app.
Step 3: Set Claude 3.7 Thinking and Send the Prompt to Cursor
Now, you’re ready to send the prompt to Cursor. Before doing that, make sure to select Claude 3.7 Thinking for the best results. This setting improves the quality of the code generation by making Cursor think through the task in more depth. Once Claude 3.7 Thinking is enabled, send your prompt to Cursor. Once you send the prompt, Cursor will generate the code for your app.
Step 4: Send Screenshots and Design Inspirations
To help Cursor understand the exact design you’re going for, you can send screenshots or inspired designs. These will guide Cursor to match the UI and UX style you want. For example, send design inspirations like:
- Neo Pop Web Design
- Gumroad UI
Make sure to include the design name so Cursor can interpret the style you're aiming for. This step ensures Cursor builds your app exactly the way you want it.
You Can Also Build Websites!
Not just apps, Cursor can also help you build websites! If you have a web design screenshot or a style in mind, simply send it to Cursor along with the languages you want to use (e.g., Tailwind for styling). Cursor will generate the code and design for the website based on your prompt.
This makes website building as easy as building a SaaS app, all by just providing a clear prompt and some design references.
- Example: I created a fully functional website from scratch in just 1 hour using Cursor, with only 5 simple prompts and a few design screenshots along with their names. Check it out here: Website built with Cursor
Free Version and Building Your SaaS
- You can use up to 3 free accounts on your PC to build your SaaS app using Cursor.
- If you need more free accounts while building, just let me know. I have a method (which I don’t encourage but can help if your SaaS is still in development) to get more free accounts.
Final Thoughts: Build Anything with the Right Prompts
With Cursor and ChatGPT, you can build anything from simple websites to full-scale SaaS apps. Whether you’re starting with a goal-tracking SaaS, a simple website, or any other project, Cursor allows you to bring your ideas to life without writing complex code. Just focus on creating clear prompts and Cursor will take care of the rest.
I created a post on here a few days ago about how I ship MVPs for my clients at lightspeed. I noticed many of you were interested in how to run an MVP agency, so I decided to go more in-depth. Here are my tips for running an MVP agency, leveraging AI to get fast results:
Build fast
- Use templates and boilerplates for common features (authentication, payments, etc.)
- Use Next.js + supabase
- Focus on critical features first. identify what truly validates the business concept
- Embrace "embarrassing MVP": ship something that's not perfect but functional that solves the core problem, your clients will like that
Leverage AI
- Use AI to code. I use Windsurf but I heard good things about Cursor and loveable as well
- Always ask AI to write clean, reusable code
- Browse the Windsurf rules directory to find applicable rules (https://windsurf.com/editor/directory)
- Very important: ask AI to write tests for you code and ask it to test. It will then iterate and fix bugs
Getting clients
- Start with your network. tell everyone what you're doing and ask for introductions
- Sponsor an entrepreneur newsletter, you need to convince them that you can build their dream product
- Create detailed case studies showcasing your fast delivery
- Offer a "concept to MVP in X weeks" guarantee with clear pricing
- Build authority through content marketing
- Show revenue on X: success attracts success, you need to build a following, a brand by building in public and sharing all progress
Provide top tier support
- Include a dedicated support period after launch (minimum 30 days)
- Create detailed documentation for clients to reference after delivery
- Schedule regular check-ins during the first month after delivery
Treat your clients well
- Position yourself as a partner, not just a service provider
- Involve clients in important decisions but do not overwhelm them with technical details!! (very important)
- Be transparent about limitations and tradeoffs in the MVP approach. People love honest people.
- Celebrate launches and milestones to build positive relationship momentum
- Provide honest advice about next steps after MVP, even if it means less revenue initially, be transparent!!
Define clear scope boundaries
- Use a simple one-page scope document that clients actually understand
- Identify "phase 2" features early and document them for future development

I have been writing more recently as part of my marketing initiative. Thought I'd do a demo of a popular AI image model, and I am astonished at the quality of images with 1 shot-prompting.
here are my 3 evaluations
Create a hyper realistic sunset of Santorini
This actually is quite realistic. 8/10 for sure. ( the neighborhood is called Imerovigli)
next up:
An astronaut riding a horse on the moon
finally a more practical test:
A logo of my company called Auspicious but just use the AU and create a reference to the element gold because AU is short for the element gold in the periodic table make it minimalistic
I am impressed.
Here's a link to the YT demo : https://youtu.be/O2gFLTKP1RQ
I have had proven success in finding discount coupons and grants via Perplexity. Read below for the breakdown. Proof is in the video at the bottom!
Finding Discount Codes with Perplexity AIPerplexity AI excels at finding current discount codes for various services. Here's how to use it effectively:
- Visit Perplexity AI: Go to perplexity.ai and create an account if you don't already have one.
- Formulate a Specific Query: Instead of asking general questions, be specific. For example:
- "What are the current working discount codes for Squarespace?"
- "Find me the best discount for [service name] in March 2025"
- Verify the Results: Always test the discount codes provided by Perplexity AI, as some may have expired or have specific conditions.
- Ask for Alternatives: If a discount code doesn't work, ask Perplexity AI for alternatives or to search for more recent codes.
Perplexity AI is particularly valuable for founders looking to maximize their startup's resources:
- Find Cloud Credits: Ask Perplexity AI about available cloud credits for startups. For example:
- "What AWS credits are available for early-stage startups?"
- "How can a new startup get free Google Cloud credits?"
video tutorial in this blog post : https://www.realreview.space/blog/use-perplexity-ai-for-discounts-and-startup-credits

Hey everyone,
I currently live in Germany, and while I appreciate many things about the country, the high tax rates are really cutting into my earnings. With my SaaS pulling in a MRR of around $5000, the steep taxes and overall cost of living here are really high. I sometimes feel like I can’t even save up any money.
I’m thinking of relocating to a place that offers a cheaper lifestyle and lower taxes.
These are the countries I have been thinking about:
• Portugal: The NHR tax regime sounds appealing, and cities like Lisbon and Porto have a growing digital nomad scene, though I’ve heard there might be upcoming changes in tax benefits for foreigners.
• Dubai: With 0% income tax and a modern, business-friendly environment, it looks promising—but I’m a bit concerned about the cost of living and work-life balance.
• Georgia (Tbilisi/Batumi): Offering a 1% tax rate for small businesses, it seems almost too good to be true. Would love to hear from anyone who’s tried it.
• Malaysia (Penang/Kuala Lumpur): Known for a low cost of living, great food, and an emerging startup scene.
• Bali: A favorite among digital nomads. I’m interested in how the community there supports indie hackers and SaaS entrepreneurs, plus the overall lifestyle and cost-effectiveness.
• South America (Paraguay/Uruguay): I’ve seen some recommendations for these countries due to their affordable living costs and potential tax benefits.
What do you all think? If you’ve made a similar move from a high-tax country like Germany, where did you go, and how’s it working out for you? Any advice or personal experiences would be really helpful as I weigh my options. Looking forward to your recommendations!
Hey everyone! Below are the rules for cursor (.cursorrules file) I have been using for Claude Sonnet 3.5 and 3.7 with Cursor AI and Next.js.
I've been building apps with cursor for a while and have learned a lot over the past few months. Something that's very important is having a good cursorrules file. It will make the difference between building a clean, well-written app and creating a messy codebase.
Below is the .cursorrules file I use. Make sure to adjust this so it works with your own setup / libraries.
App summary:
{{write a summary of your app here}}
Target Audience
{{replace with your target audience}}
Tech stack
- Next.js (app router) 15.1.3
- Tailwind 3.4.1
- Typescript 5
- React-icons 5.3.0
- m3 macbook (important in for cursor to know for generating commands)
- Add any libs you may use
These are your rules, you must read these before every implementation your make and make sure you adhere to them:
- When writing classes, make sure to always use tailwind classes and colors. Make sure to always check that you use the content colors for foreground. Look at the existing components and use similar classes.
- For icons, use the react-icons library. (change if needed)
- Always use best practices and write clean, simple and readable code. Split up in multiple files and components if needed. Aim for readability and maintainability.
- Do not remove any existing code and functionalities unless asked. Only do as asked.
- Do not use the ternary operator unless it's very readable
- I use next.js app router (change if needed), so make sure to use "use client" where needed.
- Design mobile first, and make sure to use the tailwind breakpoints.
- Use the next/image component for images.
- Aim for simplicity and readability. A simpler design is better. Do not add unnecessary complexity or additional divs / components.
- Do not add unnecessary comments
- Reason and think step by step
- Use semantic HTML tags where possible
- Keep Good SEO in mind
- Don't use CDN links for libraries. Use local files
- I work on a mac with an M3 chip (change if needed)
Before generating any code, read ALL these rules again carefully and make sure you adhere to them. Do only as asked and write as little code as possible. Very important! only do as asked!
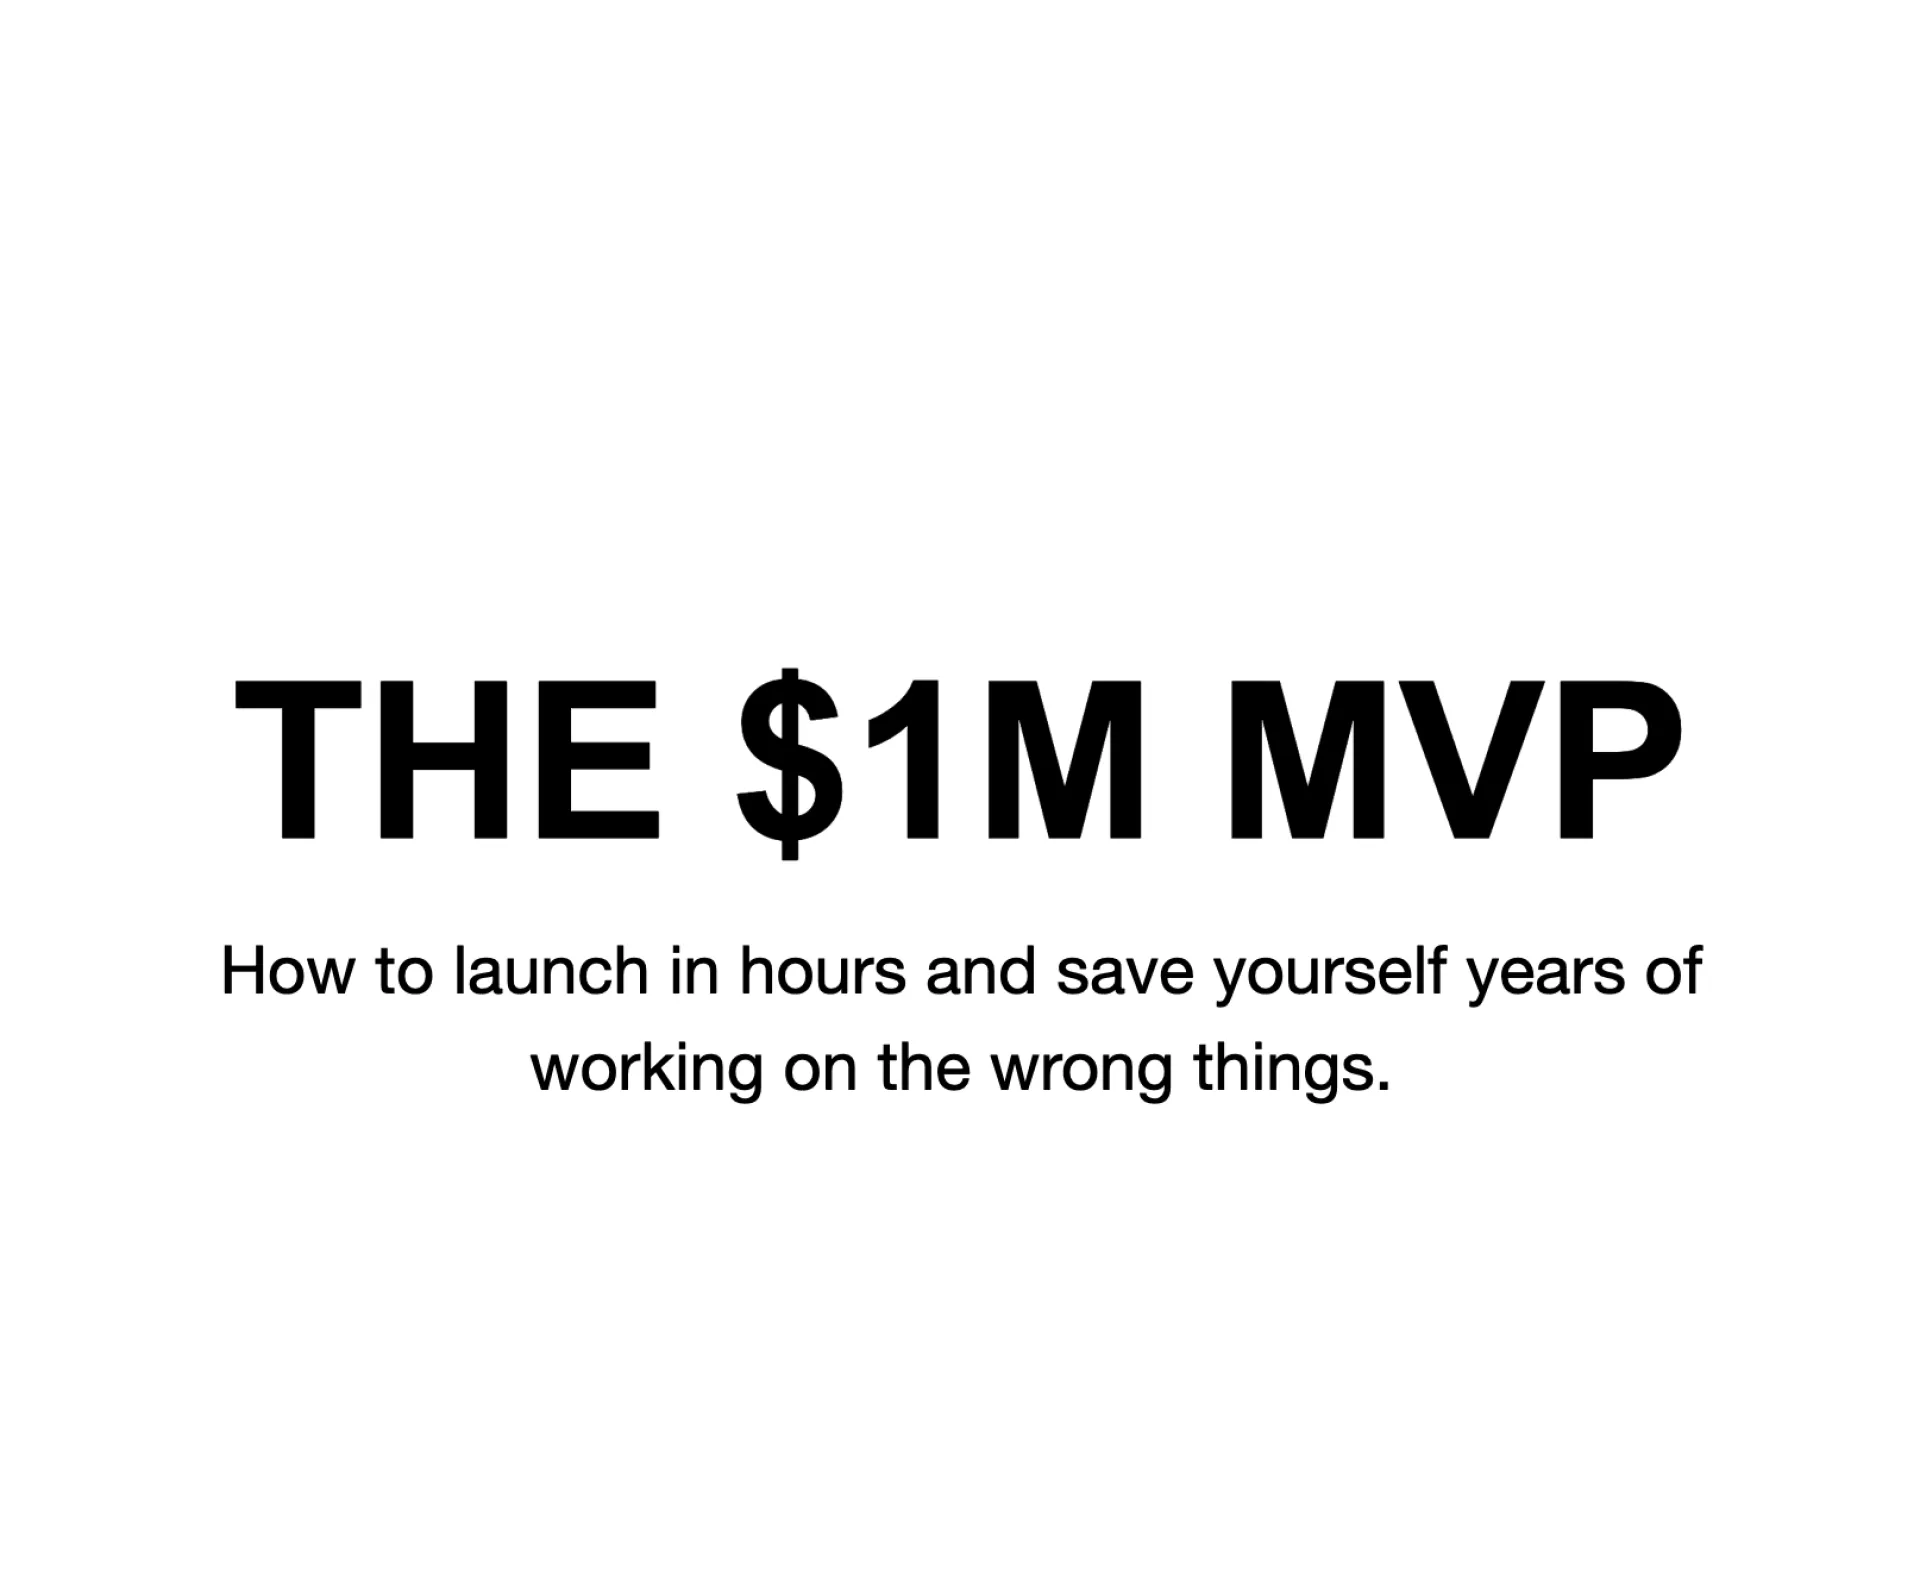
I was recently reading a Google doc called "The $1M MVP" by Pat Walls and just realised how insanely valuable it is for founders. It contains concrete information on what to do and what not to do when building an MVP and takes like 15 minutes to read. It will save you years of time and headache.
Check it out here: https://x.com/thepatwalls/status/1856341863910760727
To just give an example, check out the excerpt from the doc below:
For example, let’s say you want to build an iPhone app.
Option 1:
- Spend 6 months building an app
- Bang your head against the wall figuring out the tech, authentication, App store approval etc etc
- Take wild guesses at what features to build and hope for the best.
- Launch the app and hope for the best
- No customers, THEN you have to figure out marketing (which could take another 6 months).
- A year later, you MIGHT have a validated idea, but you might not.
Result: 12+ months of work, potentially nothing to show for it.
Option 2:
- In 24 hours create a landing page about your upcoming app.
- You share that landing page with your network, online, and to potential customers
- The landing page collects emails through a waitlist.
- You reach out to those customers and ask them about the most important features for them.
- You ask these customers what features they would pay for.
- You know exactly what features to build.
- You build up a strong waitlist
- Then you build the app in 1 month, and potentially have paying customers on Day 1, and you know it’s already validated.
Result: In 24 hours, you got enough information that helped inform your decision to build even further.
The MVR mindset is kind of like a “fake it til you make it” approach.
Sell the dream first, with a super stripped down approach. You don’t need all of the fancy stuff. Fancy logo, growth strategy, all the features, just focus on getting information.
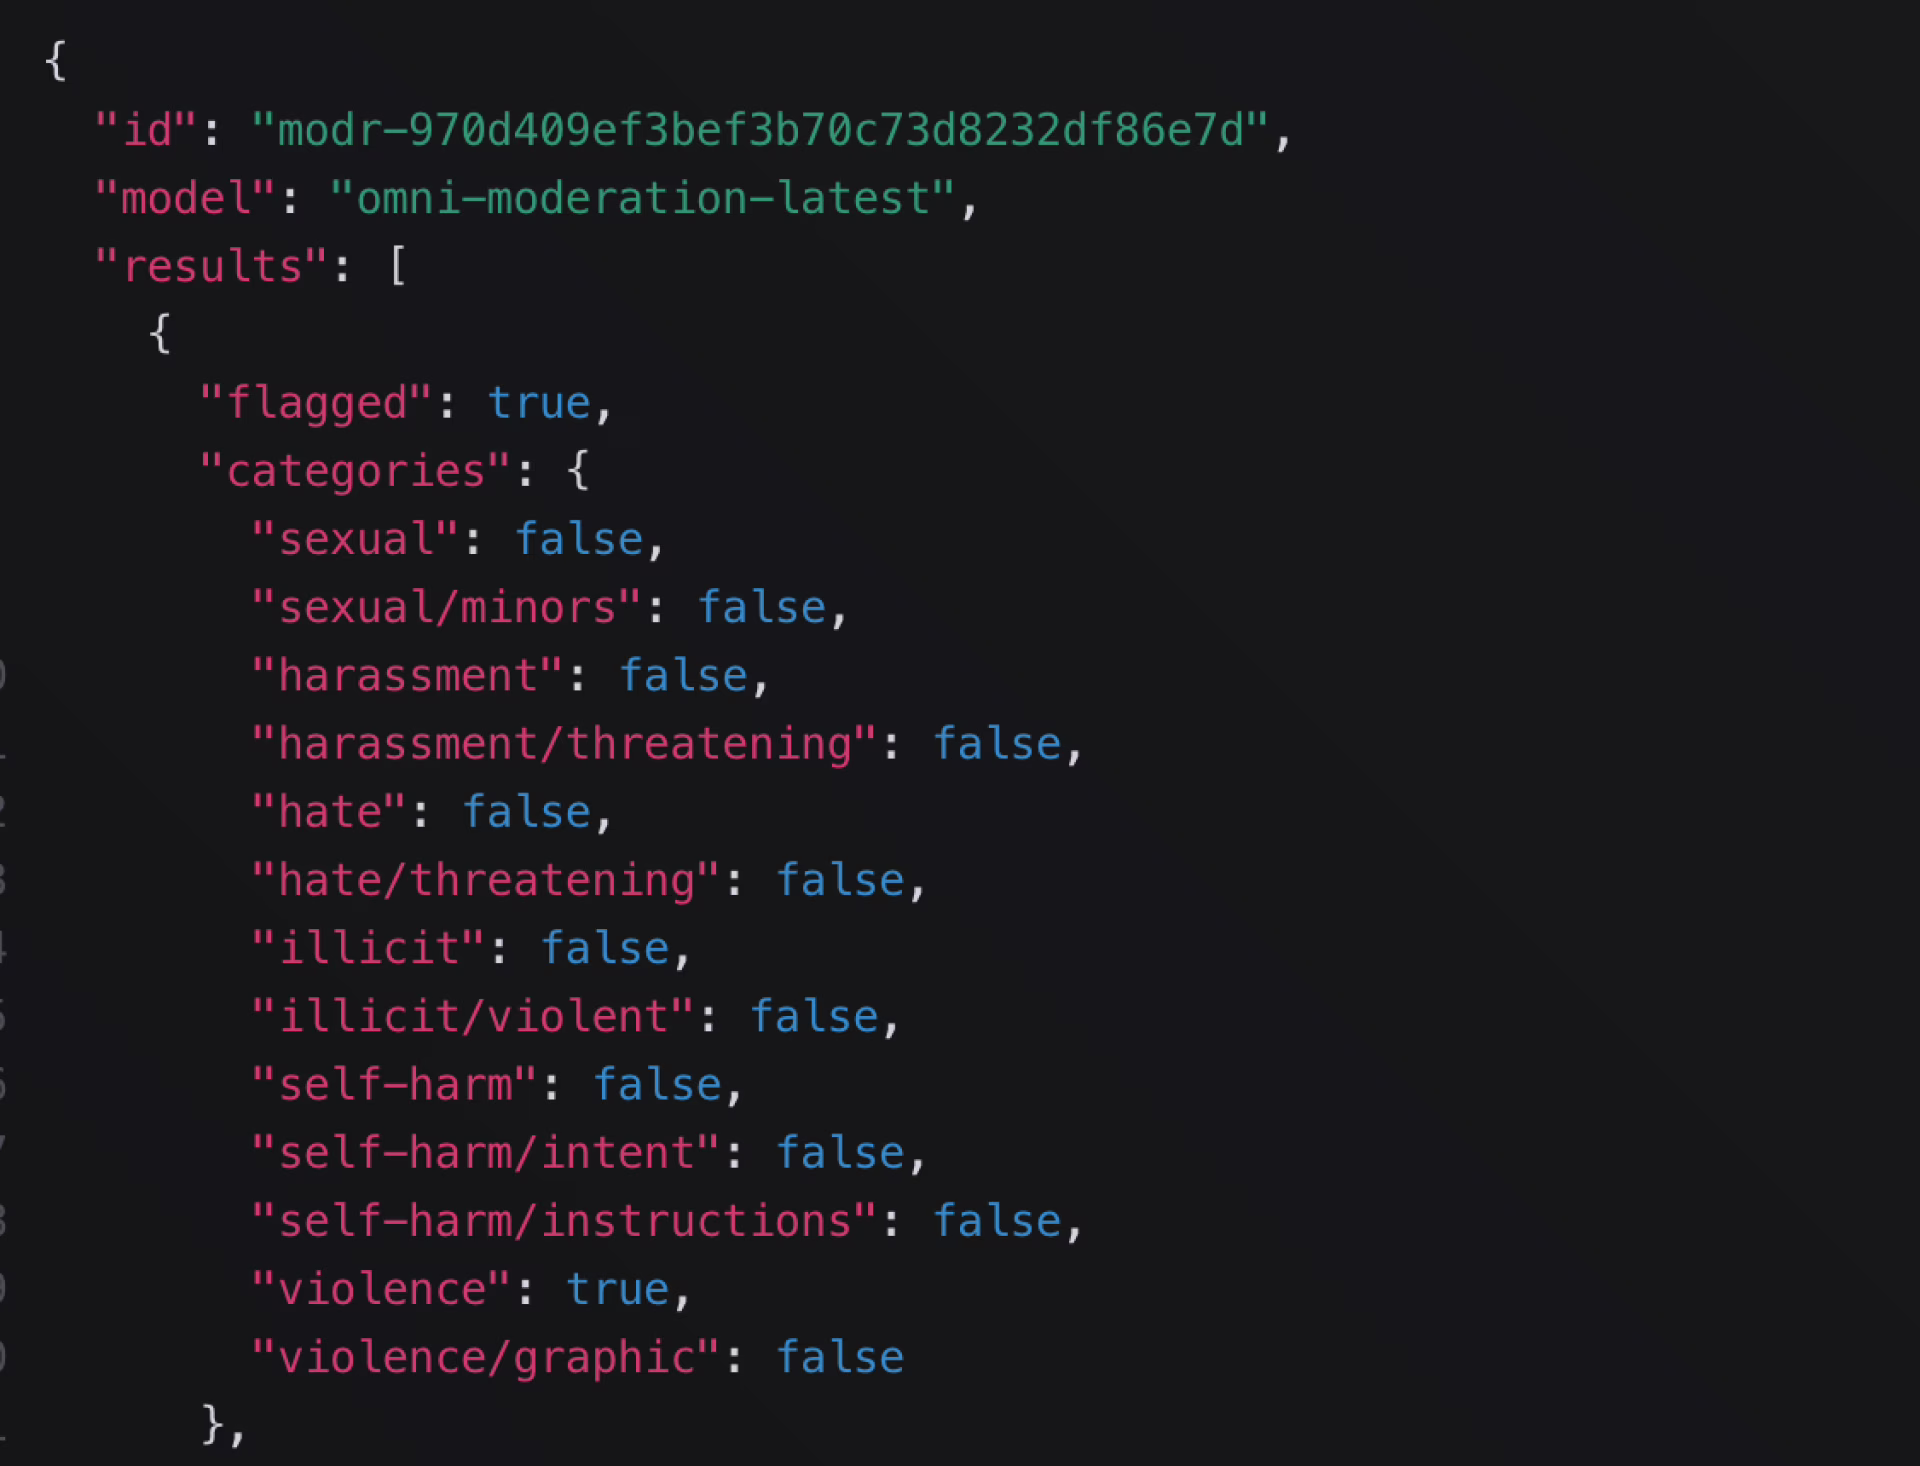
For anyone who needs to moderate user generated content: OpenAI offers a free Moderation API. It can can be used to filter out harmful images or content and I'm using it to moderate Huzzler (and it works great).
Thought this may come in handy for some of you.